
January 31, 2025 • Doghouse Tic Tac Toe
Hello! Hope you've had a wonderful week. I sure did and as most weeks, I’m excited to share my project with you. It comes with some “This is how I did it” instructions, but several things were experiments and could have gone totally wrong. 😅 I also have some temperature changes I’d make when doing it again! More to come on this below.
There were lots of pulls involved in this week’s murrini to make all the puppy parts and trying to make sure I have plenty for everyone. I created one older version of the puppy (Reesy) and then two new fellas have come on the scene. I put the puppies, cardinals, tulips and the slender leaves together into one big project...that is a game! I did a Tic Tac Toe class years ago when I was teaching fusing and it seemed like a fun time to put a new twist on an old project. Here we go!

Housekeeping notes: (not doghousekeeping)🤣 Just a reminder that my website has a new section under the Tips/Tutorials page called “Snip Tips” which shows how I place my nippers on the shapes of different murrini for snipping.
Bugsy the Bichon

Named after my friend Joni’s first Bichon, this white puppy is adorable with just a hint of grey on his chest. How can you not love his all black eyes. ❤️. Bugsy looks best at a tack or contour fuse, because the black eyes did tend to shine through the surrounding white in a full fuse. See a fully fused sample later in the blog. Just below is Bugsy tack fused at a 1310 top temp with a 10 minute hold.

He’s a frisky fella! Here is a tack fused Bugsy dreaming of a bone and frolicking in the tulips. This adorable fusible bone is handmade by Keith and Maria from Eleven11Glass. They are available in COE 90 and 96.

Derby has a black body with a hint of Terra Cotta that matches his head and ears. He is cute at all temperatures.

Reesy is happy to be back! His Chestnut Brown head and body is highlighted by his Terra Cotta ears and chest. He is also cute at all temperatures.

These colorful tulips are made with Oceanside Lilac, Orange and Hydrangea. They need to be tack fused to retain the frilly points at the top. The tulips may vary in size within each package, but are mostly medium in size. They will also be offered in single color multi-size packages as a variation under the Trio listing.

These beautiful slender two-toned green leaves are perfect for your tulip patch! Sizes will vary a little in each package. I recommend wheeled nippers only and check out placement in the Snip-Tips section of the website. These are pretty in all temperatures, but to retain the pointy end you’ll need to keep it at a tack fuse.

Mama and Papa Cardinal are back! They will be sold as a DUO and as singles as a variation under the DUO listing. Sizes in each package will vary some. A light tack fuse is recommended to retain the shape of the bird. Lisa had all the Cardinals packaged when I realized I had forgotten to photograph this week's batches. So I used the Cardinals she had sitting to the side as slight seconds and on the larger side. However, I wanted you to see the inner design of this week’s pulls.

Above are this week’s murrini fully fused. Most murrini this week lose their outer design in a full fuse. However, you can see the pups are still adorable rounded. It is a bit harder to see in this photo, but Bugsy (white pup) does have a bit of a darker shadow above his eyes through the white. Keep that in mind if you want to full fuse him.
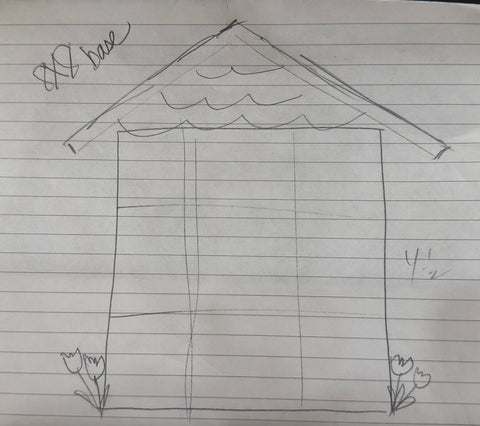
First comes the rough sketch of my idea. I wanted the Tic Tac Toe part to be just the body of the doghouse, but with cute shake siding at the top and of course a roof. My initial thought was a project that was 8X8, however, I decided to put a border on it which made the overall size 9X9.

I took one piece of 9X9 Chocolate glass and sprinkled it with clear glass powder. This is to prevent bubbles in the full fuse.

I then cut a 6X8 piece of Oceanside White and Blue Wispy glass and a 2X8 piece of Dark Green. I centered it over another 9X9 piece of Chocolate glass (like the one already prepped in the kiln). I did dust this piece of Chocolate with clear powder as well before placing my sky and grass. I then placed this 9X9 over the top of the 9X9 in the kiln. This gives me 6mm of chocolate as the base.


I also cut 1.25 inch squares for the game pieces and placed a slightly smaller piece of a different color on top. I chose Black and Almond for one set of squares, and Terra Cotta and White for my second set of squares. (I also have my full fuse test pieces in here as well). I ran this at a moderately slow full fuse:
150>1150>30
350>1450>20
9999>950>3 hours
150>800>15
300>room temp

Next, I temporarily placed my doghouse base down and decorated around it since I'm not fusing the doghouse to the background. I also took some of Joni's brown variegated stringers and put them in a torch just to make them wiggly branches. I put a few leaves on the branches and placed Mama and Papa Cardinal in the tree. (They are the game judges in case someone tries to cheat!) I then placed my tulips and leaves, sprinkling on some Fern fine frit and then some Dark Green, Fern, and Amazon Green medium frit for the grass.

I removed the doghouse and placed the background in the kiln for a light tack fuse. I also decorated my game pieces that I had previously fully fused, with Derby on the Black game pieces and Reesy on the Terra Cotta pieces. I ran a slower than normal ramp just because the base piece is so big and wanted to go slow.
350>1300>no hold
9999>950>4 hours
150>800>15
300>room temp

Next came the assembly of the doghouse. Since the doghouse is going to be tack fused together, it needed an underlying piece of glass to be the base (the white piece) 1) With a large piece of paper under the Chocolate square, I sketched a general roof size. I folded the paper in half (so my two sides would be even) and cut a triangle out that fit the top of the square but did not go all the way to the edges of the square. I placed the pattern piece on a 2mm piece of white glass and the brown square to make a general size measurement then 2) cut out one solid piece that will go the full length of the back of the doghouse. I cut it to fit slightly INSIDE the edges of the doghouse as we don't want it to show. It measured just slightly over 4 inches on the lower 3 sides. After my 2mm white piece was cut, I then cut two Terra Cotta triangles slightly larger than the paper template (to cover the white background) but still a bit short of the width of the square. These triangles are the base layer under the shake siding. 3) I stacked the two triangles (so the height would be an even 6mm to the Chocolate square) and 4) placed the bottom square over the white background. Making sure I couldn't see any white, I tacked all the pieces together with a dot of superglue between the triangles and the square. The backing didn't necessarily need to be white, but Oceanside only makes 2mm in white, clear and black that I know of. I happened to have 2mm white on hand and it won't show in the end.

Next comes the shake siding. I used 2mm white glass because I think 3mm glass would have been too thick here. I cut about 30 pieces that were 3/4 X 5/6 (3/4 is the length and 5/6 is the width) and with wheeled nippers I snipped off two of the corners off the length (less to grind off) and put it on the grinder to round up the one end. After I washed and dried the pieces, I placed the bottom row first (overlapping the Chocolate square) and marked with a sharpie where I needed to score and break to fit along the edges. I made sure I didn't go past the underneath pieces as I wanted the roof to fit snugly against the side.

For the roof I measured the tallest part of the triangle and cut a 3mm piece of black glass to fit at that height. For this piece it was about 1/2 inch in width and then cut the length to go past the sides of the doghouse, which was just shy of 4". I didn't attempt an angle for them to meet up perfectly at the top point. Instead I cut my second piece of black roof to be 3mm shorter and just had them meet together (see upper left image).

Since it is going in for a solid tack fuse, and the roof needed to be held firmly against the rest of the piece, I cut 1/32 piece of fiber paper and a matching piece of Thinfire (putting the thinfire up against the black for a smoother finish) between a dam and the roof. It felt nice and solid. As I was taking one last look and was getting ready to close the lid, I realized the inner part of the roof sticking out past the doghouse needed held in place as well so it didn't sag over in the fuse. So I placed fiber paper and Thinfire up against that area held by a washer and a little kiln post (lower left). Since I couldn't get the little kiln posts any closer (without touching the sides of the project), I put little strips of fiber paper between the washer and the dam to help keep the washer even and flat against the project (lower right image).
I was REALLY nervous about this one and was plotting in my mind how I'd quickly make another less complicated doghouse in time for this weekend! But I went slowly up AND slowly down, let the kiln cool completely and let it sit overnight so all parts of this thick project would cool completely before lifting the lid.
I used this schedule:
350>1330> no hold (this was in my smaller kiln that gets a bit hotter)
9999>950>6 hours
150>800>15
150>room temp>then sat overnight to completely cool
Let's talk temps for a minute. The doghouse experiment made me sweat and I'm feeling kinda lucky it turned out so well. The firing schedule temperatures are based on Oceanside's recommended schedules and are what I used in my kilns. However, remember that all kilns are different - even the Paragon kilns in my own studio fire differently, so your schedule may need to be different. You could also ramp up and down even slower! I know some folks take their thicker projects only 50 degrees per hour both up and down. When in doubt, it's always best to use slower ramps (when going up and down) and longer anneals.

After my pieces were all fired, I wanted to pad them so they could be placed on top of each other with a little cushion. I chose to buy some self-adhesive cork for the back of my doghouse and game pieces, and put thick adhesive felt circles (the kind you put under chair legs to protect your floor) on the main background. The cork adhesive was pretty darn sticky and I cut it just shy of the edge. It shows just a bit when you look from the side, so I should have come in more like 1/4 inch instead of 1/8. I'll use an Exacto knife to trim it back some.

I put a nice padded felt circle in each corner and one in the middle for a center support. I also cut little cork squares to adhere to the back of the game pieces.

When finished, I took a photo of it from the side to show how it sits up off the table nicely.

____________________________________
Hints on the Horizon:
On Saturday, February 15, I will have some Spring/Easter designs such as Crosses, Dogwood Kits, and Shamrocks, as well as a big Green Leaf Mix and a bunch of flowers (some will be seconds as they were tests). I’ve been working on a new design that is ADORABLE and have the kinks worked out. So I’ll begin making quite a few of them and will have them ready on March 1 which will also be Critter Week (Lord willing). Stay tuned…I think you are going to love it! 😃
____________________________________
Helpful Links:
If you use COE 90, be sure to shop Lori’s beautiful murrini and mille options found at Wilderness Glass.
Oceanside's recommended Firing Schedules.
If you are looking for COE 96 stringer or pre-fused dots, Joni pulls matching stringer for the items I have each week. Find her beautiful work at Aggie Glass Designs.
If you are looking for Mike LaChance’s fusible COE 96 handcrafted Bails, find his unique work at Mike’s Innovative Glass.
For beautiful COE96 frit blends, check out Val Cox's website.
My favorite flattening technique is from a tutorial by Nancy Sala. It’s worth the $8 for the excellent tips she gives. Once purchased and she sees your order, she will email you the tutorial in a PDF.
For Tiny Doggie Bones and other beautiful torch-made COE 96 glass components, check out the Lunger’s Eleven11Glass website.